Showing posts with label chalcedony. Show all posts

Sunday, August 09, 2009

The Problem With Bright Sunlight

Actually there isn't one - apart from when it comes to photography, particularly when it comes to photographing beads.
Specifically when it comes to photographing beads made with Gaffers Chalcedony.

I prefer not to tamper with or brighten my photo's. Something I learned some time back when a buyer complained that my colours were 'over saturated' was that you just aren't going to satisfy some people, no matter how colour correct your image is on your monitor.
I also learned that you can't even try explain to someone that it is their monitor that is displaying incorrectly, even when they mention the yellow in the bead which isn't apparent either in the bead itself or any of the photo's you have of it... not even if you refer them to the fact that the bead was listed as 'Ivory'.

Chalcedony is a whole new ball game both under studio lights & in the sunlight. If one of the colours in the glass looks right, then another will look wrong. When the blues show up well in a photo - the pinks don't & the opposite is also true.


In the sun from above - pretty good for the solid areas of pink/purple, but the blues aren't showing their true tones.

In the sun from in front & slightly above - the decent size area's of blue show correctly, the pink is a bit bright & the colours on the smaller beads just look washed out.

Out of direct sun (& the flash goes off). Blues appear correct, pinks look more purple, but at least the spacers don't look so insipid.

What is a girl to do?

Saturday, July 18, 2009

Chalcedony Unplugged

Unaulteradted & unedited. No wonder I love this stuff!

Monday, July 13, 2009

Tabs In Chalcedony

I have so much to photograph that it's just not funny!
The thing is I don't feel like photographing anything. Actually I dont feel much like doing anything at all.....except melting more glass.

Chalcedony Tabs
A bit of playing with a different shape in Chalcedony ;o)

Wednesday, June 24, 2009

Progression of the Alabastron

The next torch session & I thought that the Alabastron should have a neck, so the first attempt got one. Then I thought why not take this a step further & put a pouring lip on them, so attempt number two got a neck & a lip.
Not wanting to spoil a good thing, along with the fact that I was pretty pleased with the scroll work but had left no space in which to place a handle without obscuring some of the design I left it without, while I built up the courage to attempt a handle.....aka 'instant hanging device.

Number three got a neck, a lip AND a handle.
Yes, ok - so it was in clear so I could fix it if I mucked up!


Saturday, June 06, 2009

After a long search

I finally (& inadvertently) find a backdrop that makes the chalcedony beads just pop!

Great colour & wonderful light absorption resulting in crystal clear eadges on the bead with no pesky reflection.

Of course the downside is that it sheds, is tempramental, knocks things over & moves right when you have everything set up & about to depress that shutter button.

I guess the search is still on ....

Friday, June 05, 2009

Do You Wig Wag?

My first attempt at a wig-wag (some call them switchback canes), the alternative to a twistie....& might I add a tad more difficult to achieve.


From where I'm looking - they can only get better ;o)
This is going to take some practise!!

Sunday, May 24, 2009

Working with G109 - Chalcedony

There is nothing worse than wanting to make a small spacer bead out of a striking glass & managing to lose the colours.
This is 'pretty much' the way I work the Gaffer G109 - Chalcedony in all of my beads, big & small. It's just with smaller spacer beads you have to be more careful about how hot you get it before the whole heap of glass drops off of the mandrel - or loses shape beyond repair.

I watched once, as a larger 'beige' over struck bead regained some wonderful shades of blue while I was gently reheating an end in order to touch up the shaping. "A-Ha!"

You do get more intense results colour wise if you work really hot, you also get a lot more veining & a more mottled effect in the surface glass. However it is not necessary to work it white hot in order to get colour.
Work it cooler, strike it gently & you will get the smoother, creamy looking finish with subtler colouring.

So, in brief, here it is:

Montage1

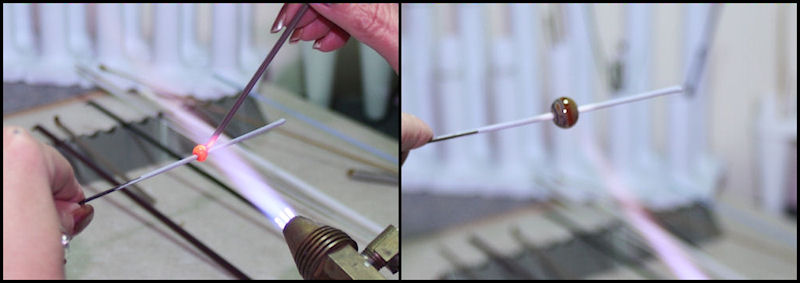
  • 1. Get the glass on the bead. There is no need to rush it.
  • 2. You can see that by the time it is on there the glass at the outside edges has started to strike already.


Montage2

  • 3. At this point I turn my flame down & work in closer to the torch face & just get the glass to a glowing orange.
  • 4. I take the bead out of the flame & let it cool until all glow is gone - checking it somewhere out of the direct light in order to detect this. Under the work bench works well. Then, with the flame turned back up to normal I introduce the bead back into it & strike it.

Montage3

  • 5. Back into a smaller flame & repeat the process.
  • 6. After the second strike cycle.


Montage4

  • 7.Once you have the transparent brown 'bloom' showing - it will strike mostly to purple & pink tones. Further heat/cool/ strike cycles will take it back to the transparent brown & then back to purples again. This bead was re-struck as it had lost colour on the sides.
  • 8.The bead went through two further strike cycles after the photo on the left (4 strike cycles in all) at no stage getting it white hot or molten enough to move.
The outside that appears brown in the photo is actually purple right through the middle.
I would just like to note that all of the photo's apart from cropping, resizing & montaging together are untouched & unedited.

The test bead below on, the other hand, went through many more strike cycles using this method, or rather one side of it did.
Using straight G109 I got the bead basic onto the mandrel & worked on shaping it. It started as a roundish glob of glass. I heated & marvered it until I had a small tube shaped bead about 36mm long & had lost most of it's colour.
The right hand side of this bead went through two strike cycles. The left hand side I continued striking until it had lost colour & then I worked on slowly striking it until I got colour back ;o)


Friday, May 01, 2009

New Look Website

I've been plodding away, with the help of the mailleman, giving my website a mini make-over & a new look homepage. I only wish that changing the look of a room was this easy.

Oh, did I say easy? Given some of the language colouring the air around here, perhaps I should have said 'this quick'. The homepage was completed a couple of days ago, & today I've been working on re-colouring the background for the sidebar buttons. If only I'd known then, what I know now, when I was initially creating those buttons - I wouldn't be having to start from scratch.

Homepage Feature on  G109,Gaffer Chalcedony

New Homepage with a feature on Gaffer 109-Chalcedony.

Doing it in this style, I shall have to periodically change the homepage. Hopefully it will get easier!


I expect that you thought that with the arrival of my new glass - you'd not have to read too much more about the Gaffer Chalcedony. I may have neglected to mention that I have quite a good range of Gaffer colours to try it on yet.
Maybe after work tomorrow ;o)

Thursday, April 30, 2009

And the Mailman Brought


Bliss in a box aka my supplies!
Oh yeah! Almost nothing excites quite like new glass.


Ok, perhaps it's just me that feels the thrill! The ginger ninja seems to be in deep denial


Yet, a couple of weeks ago, when I was trying to sort my chalcedony glass & get some packed for shipping....