
There is nothing worse than wanting to make a small spacer bead out of a striking glass & managing to lose the colours.
This is 'pretty much' the way I work the Gaffer G109 - Chalcedony in all of my beads, big & small. It's just with smaller spacer beads you have to be more careful about how hot you get it before the whole heap of glass drops off of the mandrel - or loses shape beyond repair.
I watched once, as a larger 'beige' over struck bead regained some wonderful shades of blue while I was gently reheating an end in order to touch up the shaping. "A-Ha!"
You do get more intense results colour wise if you work really hot, you also get a lot more veining & a more mottled effect in the surface glass. However it is not necessary to work it white hot in order to get colour.
Work it cooler, strike it gently & you will get the smoother, creamy looking finish with subtler colouring.
So, in brief, here it is:
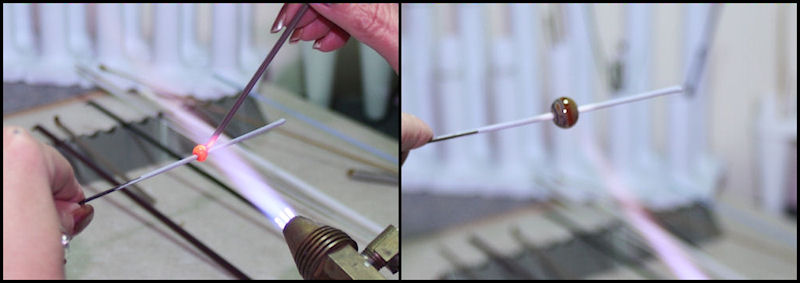
- 1. Get the glass on the bead. There is no need to rush it.
- 2. You can see that by the time it is on there the glass at the outside edges has started to strike already.

- 3. At this point I turn my flame down & work in closer to the torch face & just get the glass to a glowing orange.
- 4. I take the bead out of the flame & let it cool until all glow is gone - checking it somewhere out of the direct light in order to detect this. Under the work bench works well. Then, with the flame turned back up to normal I introduce the bead back into it & strike it.
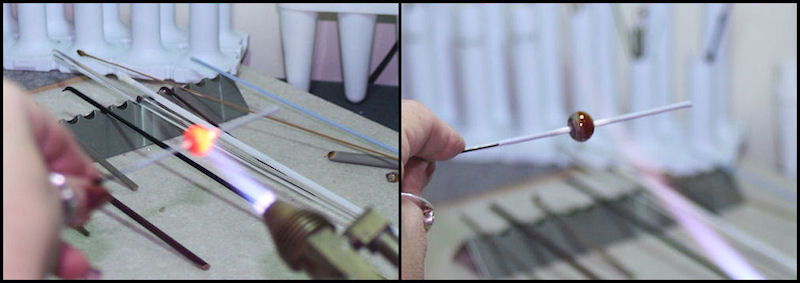
- 5. Back into a smaller flame & repeat the process.
- 6. After the second strike cycle.

- 7.Once you have the transparent brown 'bloom' showing - it will strike mostly to purple & pink tones. Further heat/cool/ strike cycles will take it back to the transparent brown & then back to purples again. This bead was re-struck as it had lost colour on the sides.
- 8.The bead went through two further strike cycles after the photo on the left (4 strike cycles in all) at no stage getting it white hot or molten enough to move.
The outside that appears brown in the photo is actually purple right through the middle.
I would just like to note that all of the photo's apart from cropping, resizing & montaging together are untouched & unedited.
The test bead below on, the other hand, went through many more strike cycles using this method, or rather one side of it did.
Using straight G109 I got the bead basic onto the mandrel & worked on shaping it. It started as a roundish glob of glass. I heated & marvered it until I had a small tube shaped bead about 36mm long & had lost most of it's colour.
The right hand side of this bead went through two strike cycles. The left hand side I continued striking until it had lost colour & then I worked on slowly striking it until I got colour back ;o)

6 comments:
Great tutorial, Deb! Thanks for sharing!
Wow! This is absolutely fascinating Deb! I bow to your mastery! Thank you for sharing your process, as well as its magnificent results! :)
Thanks for the info. You're beads are always gorgeous - it's nice to find out how you're doing it. If I EVER manage to get this glass, now I'll know what to do with it.:)
DEB YOU ROCK..
thanks so much....
great tutorial
all our love
mona & the girls
I simply LOVE Gaffer Glass, especially the Chalcedonies, but my question is why do my beads crack using Gaffer clear? Does Chalcedony like to be encased?
Cathy - I'm sorry I have no idea why your beads would crack after using Gaffer clear as I have never had any problem with it. I use it both as a base & to encase with the Chalcedonies & other Gaffer glasses.
Gaffer do guarantee their glasses compatibility within the Gaffer range... so if this is an ongoing issue for you perhaps the best idea would be to contact them.
Sorry I can't be of more help.
Post a Comment