
I know a lot of people find a photo editing program they like and use it exclusively. I was like that for eight years, with PaintShop Pro - with one exception.
Years ago when I first started selling on our auction website here in New Zealand I needed to find an easy eway to stitch photo's together, as our wonderful auction website only allowed 1 photo per listing.
Even though I had & used PaintShop pro, I got a bit impatient at having to create new layers and copy & paste selections, every time I wanted to montage images together. Besides it involved calculations, and math is not my strong point.
That's when Irfanview came into play.
When I was working at the gallery often my job involved photographing the sets of two or panels of artwork that were made to be hung together in a specific sequence, know as Diptychs & Triptychs. Of course for the web and such this meant photographing them so they looked the same as they did when displayed - fun stuff when things often weren't photographed 'in situ'. Boy did I miss the clever little free program that I had at home, that made tedious tasks so much faster, then.
I now use both Photoshop and Paintshop Pro. Ultimately Photoshop is a more powerful program, but the learning curve is huge & convoluted. There are some things that PaintShop Pro does equally as well - but the processes are so much simpler and quicker to achieve.
Often you will find that you want to show more than one aspect of a bead or a piece of jewelry, but the piece loses perspective and cohesion when each image is displayed separately - this is where Irfanview, and in particular it's 'Create Panorama' function steps in and makes a process quick and easy.
Irfanview is free, quick to download & install from http://www.irfanview.net/
I put this together for a friend a couple of months back, so I have a copy in a Word doc, if anyone would like a printer friendly version.....just email me.
Creating a Montage of Images in Irfanview
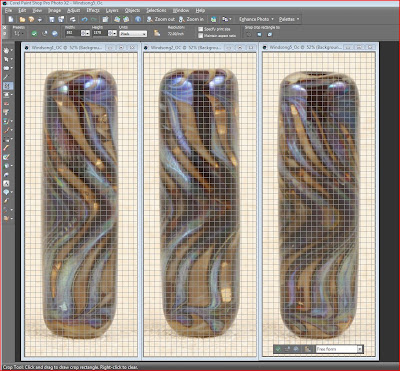
First of all have your images all cropped & ready to go in the editing program of choice. I already have the borders around them at this stage, but Irfanview has the ability to do that also.
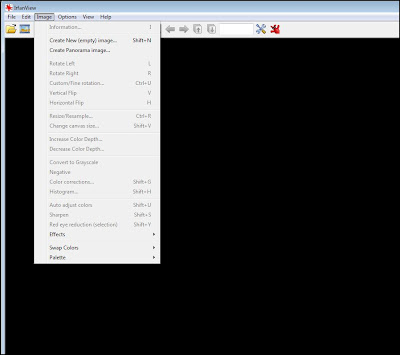
Open it up & go to Create Panorama Image, under “Images” on the menu.
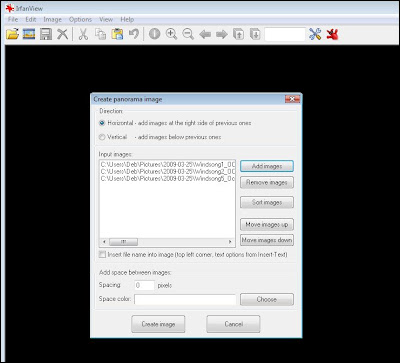
At this point check as to whether you want your images added horizontally or vertically. You can also add your spacing between the images at this stage if you wish( or have not added borders previously).
It allows you to add the images one at a time. Then hit the “Create Image” button – easy peasy!
Voila!! You have your images montaged together.

**At this point it is also worth noting that depending on how you have named/numbered your images can affect how they show.
I use numbers after the image name and, of course, add them in that order.
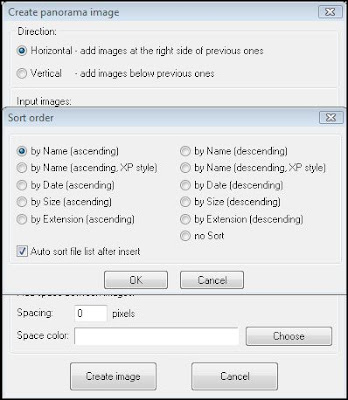
Any personal preferences to allow for the way you name files can be made in the “Sort Order” window at this point, found under the “Sort Images” button above.
Just stating the obvious, I know ;o) Someone played with my settings once & I couldn’t figure why my images ended up displaying in some random order in the merge. It took me ages to figure out what had been done &, I’m ashamed to say, find how to fix it!
This is the default setting – which is what use. Unless someone has changed it……
When saving – check what the defaults are set to in the box to the right the first time you do it. I always save at 100%.
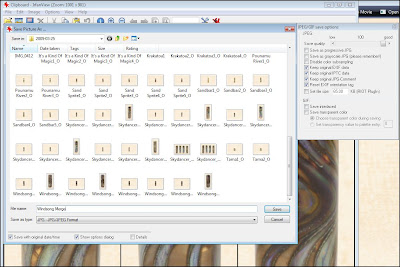
My images that I imported into Irfanview were only cropped, & not resized at all, that way I always have a larger size of the merged images to work from.
I take them back into Paintshop Pro to resize to a suitable publishing size depending on what venue I am using.
First of all have your images all cropped & ready to go in the editing program of choice. I already have the borders around them at this stage, but Irfanview has the ability to do that also.

Open it up & go to Create Panorama Image, under “Images” on the menu.

At this point check as to whether you want your images added horizontally or vertically. You can also add your spacing between the images at this stage if you wish( or have not added borders previously).
It allows you to add the images one at a time. Then hit the “Create Image” button – easy peasy!

Voila!! You have your images montaged together.

**At this point it is also worth noting that depending on how you have named/numbered your images can affect how they show.
I use numbers after the image name and, of course, add them in that order.
Any personal preferences to allow for the way you name files can be made in the “Sort Order” window at this point, found under the “Sort Images” button above.
Just stating the obvious, I know ;o) Someone played with my settings once & I couldn’t figure why my images ended up displaying in some random order in the merge. It took me ages to figure out what had been done &, I’m ashamed to say, find how to fix it!
This is the default setting – which is what use. Unless someone has changed it……

When saving – check what the defaults are set to in the box to the right the first time you do it. I always save at 100%.

My images that I imported into Irfanview were only cropped, & not resized at all, that way I always have a larger size of the merged images to work from.
I take them back into Paintshop Pro to resize to a suitable publishing size depending on what venue I am using.
1 comment:
Thank you, Deb. Now I have to try it. When you get a chance can you send me the printer friendly version? Thanks.
Post a Comment